If you would like to make one of these cute pumpkins here is how we made it.
 You will need:
1. 3 wood pieces of scrap 2x4's (size and shape depending on how big you want your pumpkin to be)
2. sand paper
3.Craft paint. We used Pure Pumpkin (dollar store)
4. Wood glue, or white glue would work
5.Hot glue and glue sticks*
6. Ribbon**
7. Small wood dowels,and clothes pins
8. Oven
*If you don't have hot glue you could probably use white glue, it would just take longer to dry and might not have as strong of hold.
**You could also use gift wrapping ribbon and curl it with scissors instead of curling ribbon in an oven. Then you will not need number 7 and 8.
Instructions:
1. With a small piece of sand paper smooth the edges and any rough spots of the wood pieces, and wipe off the dust particles.
2. Glue the 3 pieces of wood together with your wood glue to form the pumpkin block. We painted them first, but you can save time and paint if you glue them together first. Make sure your piece are lined up straight so the bottom is not wobbly. Let glue dry until pieces are suck firmly together. You may want to use a wood clamp if you have one. If some of the glue oozes out of the sides you can sand it off to male it smooth
 3. After the pumpkin is glued together you can paint it. Allow the paint to dry between coats if more than one coat of paint is needed. Ours took 2 coats of paint
 4. There are a few different ways to finish off the pumpkin. One way is to wrap a thick ribbon(3")around the block and tie a bow on top. I would have done this if we had the ribbon.
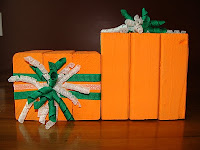
The way we finished our pumpkins was by wrapping 3 ribbons around the block, glueing the ends with hot glue onto the top of the block so they didn't fall off.
 Then we curled some ribbon in the oven and hot glued a bunch of it on top of the block.

No comments:
Post a Comment