B and M put thier heads together to write a story about going to the dentist. Here is the result of thier hard work.
A Trip to the Dentist
One summer afternoon while Fred the crocodile was eating his lunch he cracked his tooth on a chicken bone.
Fred went and told Mama Croc that he hurt his tooth.
Mama Croc told Fred that she would make an appointment with the dentist, Dr. Hippo. “Dr. Hippo is the most genius dentist in the jungle. He will fix your tooth.” Mama Croc explained.
Fred was a little nervous about going to the dentist. He wasn’t sure about someone looking in his mouth, and fixing his tooth.
Mama Croc told Fred not to worry. She put her arm around him, and sat him down on Papa Croc’s chair.
Mama Croc told Fred about the little mirror and pick Dr. Hippo would use to look in his mouth. She told him about the mint flavoured numbing gel he would put in his mouth, so Fred wouldn’t have to feel anything while Dr. Hippo fixed his tooth.
Mama Croc told Fred that Dr. Hippo saves the best part for last. Fred would get a new tooth brush, and he would get to pick a prize out of Dr. Hippo’s special green prize box.
After Mama Croc described to Fred what the dentist would be like he wasn’t nervous anymore about going. He was even a little excited to get a new tooth brush and a prize.
The next day Mama Croc and Fred went to the dentist to get his tooth fixed.
Wednesday, December 7, 2011
Thursday, November 3, 2011
Remembrance Day
Now that that all the excitement of Trick-or-Treating is over and the sugar buzzes have worn off it is time to focus on the great men and women that gave there lives for this country to keep us free and safe. We are learning the poems In Flanders Fields by Lieutenant Colonel John McCrae. We are also going to be making poppy wreath crafts to helps us remember.
Tuesday, November 1, 2011
Science experiments
If you are ever in need of a science experiments I came across a fun web site today. It has 52 differnet experiments to try out. I can wait roll up my sleeves and dirty. All in the name of learning.
Wednesday, October 19, 2011
Freezing Carrots
The kids and I planted and took care of a garden this year . Then we harvested the wonderful vegetables and fruits it produced. Now the question is what do we do with it all. Some of the produce we ate fresh out of the garden like the peas and spaghetti squash. Others we had to freeze or bottle(can) to preserve them for a later time, so they wouldn't go bad before we could eat them. We made pickled beets, and froze carrots. I did most of the beets by myself, but the kids helped with the carrots. We followed the instructions found in the link. It didn't take very long, and was simple enough for the kids to help.
Monday, October 3, 2011
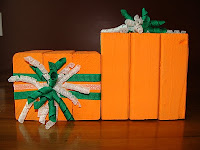
Pumpkin Table Center Piece
This Pumpkin project served two purposes. It makes a really cute Fall/Halloween craft, and it also was a recycling project. The materials we used for this craft were scrap materials from an uncle that is building a house. We rescued the wood form going to the dump. We also used scrap pieces of ribbon that were laying around the house.
If you would like to make one of these cute pumpkins here is how we made it.
 You will need:
1. 3 wood pieces of scrap 2x4's (size and shape depending on how big you want your pumpkin to be)
2. sand paper
3.Craft paint. We used Pure Pumpkin (dollar store)
4. Wood glue, or white glue would work
5.Hot glue and glue sticks*
6. Ribbon**
7. Small wood dowels,and clothes pins
8. Oven
*If you don't have hot glue you could probably use white glue, it would just take longer to dry and might not have as strong of hold.
**You could also use gift wrapping ribbon and curl it with scissors instead of curling ribbon in an oven. Then you will not need number 7 and 8.
Instructions:
1. With a small piece of sand paper smooth the edges and any rough spots of the wood pieces, and wipe off the dust particles.
2. Glue the 3 pieces of wood together with your wood glue to form the pumpkin block. We painted them first, but you can save time and paint if you glue them together first. Make sure your piece are lined up straight so the bottom is not wobbly. Let glue dry until pieces are suck firmly together. You may want to use a wood clamp if you have one. If some of the glue oozes out of the sides you can sand it off to male it smooth 3. After the pumpkin is glued together you can paint it. Allow the paint to dry between coats if more than one coat of paint is needed. Ours took 2 coats of paint
 4. There are a few different ways to finish off the pumpkin. One way is to wrap a thick ribbon(3")around the block and tie a bow on top. I would have done this if we had the ribbon.
The way we finished our pumpkins was by wrapping 3 ribbons around the block, glueing the ends with hot glue onto the top of the block so they didn't fall off. Then we curled some ribbon in the oven and hot glued a bunch of it on top of the block.


If you would like to make one of these cute pumpkins here is how we made it.
You will need:1. 3 wood pieces of scrap 2x4's (size and shape depending on how big you want your pumpkin to be)
2. sand paper
3.Craft paint. We used Pure Pumpkin (dollar store)
4. Wood glue, or white glue would work
5.Hot glue and glue sticks*
6. Ribbon**
7. Small wood dowels,and clothes pins
8. Oven
*If you don't have hot glue you could probably use white glue, it would just take longer to dry and might not have as strong of hold.
**You could also use gift wrapping ribbon and curl it with scissors instead of curling ribbon in an oven. Then you will not need number 7 and 8.
Instructions:
1. With a small piece of sand paper smooth the edges and any rough spots of the wood pieces, and wipe off the dust particles.
2. Glue the 3 pieces of wood together with your wood glue to form the pumpkin block. We painted them first, but you can save time and paint if you glue them together first. Make sure your piece are lined up straight so the bottom is not wobbly. Let glue dry until pieces are suck firmly together. You may want to use a wood clamp if you have one. If some of the glue oozes out of the sides you can sand it off to male it smooth
3. After the pumpkin is glued together you can paint it. Allow the paint to dry between coats if more than one coat of paint is needed. Ours took 2 coats of paint4. There are a few different ways to finish off the pumpkin. One way is to wrap a thick ribbon(3")around the block and tie a bow on top. I would have done this if we had the ribbon.The way we finished our pumpkins was by wrapping 3 ribbons around the block, glueing the ends with hot glue onto the top of the block so they didn't fall off.
Then we curled some ribbon in the oven and hot glued a bunch of it on top of the block.Saturday, October 1, 2011
13 Artilces of Faith
As members of The Church of Jesus Christ of Latter-Day Saints we try and incorporate the gospel of Jesus Christ into our studies. One of our goal for this school year is to memorize and understand the 13 Articles of Faith. An other way we incorporate the teaching of the church is by studying the Book of Mormon. Discover the Scriptures is a great program of study that allows us to use scripture verse to teach memorization skills, reading comprehension and cursive lettering practice. It also offers great memory verse opportunities.
Ice Ice Baby
Can states of matter really change? To answer this question, Miss. M wanted to see if she could change a liquid (water) into a solid (ice), and a liquid (water) into a gas (water vapor). For the first part of her experiment she filled an ice cube tray with water and placed it into the freezer for 4-5 hours. The freezer lowered the temperature of the water below zero degrees Celsius, and walla, the water (liquid) froze into ice (solid). The next step of her experiment was to see if she could change the ice(solid) back in to water (liquid). To do this she took the tray of ice cubes out of the freezer, and placed them onto the counter top. As she observed the ice cubes she noticed that it didn't take long before the ice started to melt back into water. For Miss. M's final test she sprayed a plate with water (liquid) form a water bottle and placed the plate outside in the hot sun. After waiting a few hours she checked back one the plate, and much to her surprise the water was gone. It had turned into water vapor (gas).
Miss. M then concluded that you can indeed change the state of matter.
Miss. M then concluded that you can indeed change the state of matter.
Saturday, September 3, 2011
Reading & Spelling Game
While browsing the Internet one day I came across a fun way to practice letter sounds, words, and spelling. It is very simple to make and only took about 5 minutes to write the letters, and 10 minutes to cut some holes. If you have a square hole punch for scrapbooking it would take even less time. I can't wait to try it out. Here is the site where I found the directions. The materials I used were a utility knife, or exacto knife, paint sample cards, and a black permanent marker.
Friday, August 12, 2011
Rock Painting
If yo ur kids are anything like mine they love to collect things. We have had a rock collection piling up on my front deck all summer. Instead of looking at a big pile of rock the kids had a great
  idea to make them into something. We got out the acrylic paints and let our imaginations take over. Here are the results. I think they are pretty impressive.


 ur kids are anything like mine they love to collect things. We have had a rock collection piling up on my front deck all summer. Instead of looking at a big pile of rock the kids had a great
  idea to make them into something. We got out the acrylic paints and let our imaginations take over. Here are the results. I think they are pretty impressive.


Saturday, August 6, 2011
Gardening Update

 It has been a few months now since we planted the garden, and all the hard work is starting to pay off. The kids and I had fresh peas with our lunch after a long hot morning of weeding last week. Reaping the rewards makes is so worth it. This gardening experiment has taught us many things about plants, and what they need to grow. Some of the things we have learned so far is that the plants will thrive when they have a bit of water everyday, and they are weeded so they do not have to compete for the water and nutrients.

Wednesday, June 22, 2011
Marathon Running
Mand B participated in a kids marathon today with some cousins and thier aunt, along with about 2000 other people. They started logging miles back in May and logged 25 miles, then all the kids joined together to run the last mile together. It was a great way for the kids to get out and get active.


Friday, June 17, 2011
Little Dancers
M and B enjoyed their dance lessons this year. The highlight of the year was of coarse the year end recital. They both did really well, and they both want to continue next year.

Wednesday, June 15, 2011
Learning Games
Cool Math Games is a really fun and educational site. One I strongly recommend if you are looking for a kids friendly games site. My kids are crazy about it. They love the games, and are unaware they are learning while they play. I enjoy the games just as much as the kids to. They have all sorts of games from math to spelling and problem solving.
Wednesday, May 18, 2011
Planting a Garden
For our unit on learning about plant needs and life cycles we decided to plant a garden in the back yard. M and B got to plan how they were going to plant the garden, and buy the seed they would need to plant. They had to find out how to plant each of the different seeds and what they need to grow.
 Dad and Grandpa ran the rototiller to prepare the soil for planting.
 We had to find the proper tools to help us make out jobs easier. Not to sure how the toque helped us, but the gloves protected our hands so we didn't get blisters from the hoe.
 We made rows to help keep the different planst organized for when we need to weed, and to give the palnts right spacing they need to grow properly.
 M spacing the seed very carefully.
 B gently covering the seeds.
  Cutting up the seed potatoes.
 Garden is all planted ready for watering.
Saturday, May 7, 2011
MOTHER'S DAY
For Mother's Day the kids wanted to make something special. We decided that we would make a Brag Board. A Brag Board is a place to hang up special pictures or drawing that your kids or grand kids have made.
 After your board and close pins are painted and dried you are ready to put the letters on the board.
We penciled our letters on the board first and then traced over them in paint.
 We placed the close pins on the board alternating the openings on the top and bottom edges. Then one by one we put a little dab of wood glue on the bottom and spread it out with a Q-tip so it was even and not to thick, and placed it in its spot back on the board. Remember to follow in sturctions on you wood glue bottle. We didn't use clamps but it for a stronger hold it would plrobably best.

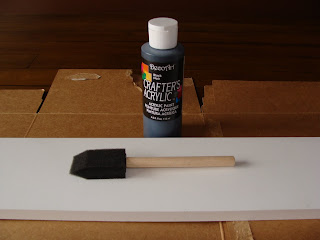
To make this project you will need: a board about 3 feet long and 2-3 inches wide, or how ever big you would like it to be. Paint(any color you like)- we used craft paint form the dollar store. We used many colors but you can make it any color you like.Paint brushes we used a sponge brush to paint the board and smaller brushes for the close pins and letter.Close pins. We used 13 on our board. Wood glue and a pencil.

Place the board on some paper or cardboard, so you don't get paint on any other surface. Cover the board with a coat of paint and let it dry. Repeat 2-3 times so you completely cover the board.
 You may want to turn your board on its side to paint the edge, or leave it flat.
 While you are letting the board dry you can paint you close pins. They may need 2 coats of paint as well. Remember to paint the inside of the close pins. Before they are completely dry you will need to open them up and make sure they are not painted shut.
After your board and close pins are painted and dried you are ready to put the letters on the board.
We penciled our letters on the board first and then traced over them in paint.
 We placed the close pins on the board alternating the openings on the top and bottom edges. Then one by one we put a little dab of wood glue on the bottom and spread it out with a Q-tip so it was even and not to thick, and placed it in its spot back on the board. Remember to follow in sturctions on you wood glue bottle. We didn't use clamps but it for a stronger hold it would plrobably best.

Thursday, April 21, 2011


Tuesday, April 19, 2011
Building Things
M and B had a unit in science this year about building things. We discussed different building materials and designs. We learned which designs are stronger than others and which types of material work better then others for different purposes. Uncle R and Aunt S are building a new house on the other side of the one next to us, and it has been fun to watch and the workers do there jobs. It was been educational for the kids to see what they have learned be put to use in life. It is one thing to read about something and look at picture and build scale models, but to have them be able to see it in real life is wonderful. As the basement was being prepared for the cement B noticed they were cutting up rebar to put reinforce the cement. It was great that instead of asking what they were doing. He just told me why they were doing it.
I love to see my children's faces light up when they have knowledge of how and why things work in this world. Learning an important part of life, and I really feel that there is more to learning than sitting in a classroom and reading out of a book. I believe when children can see with there own eyes, or do with there own hands there understanding and knowledge of the subject at hand is increased and they will have greater retention of that knowledge for future use.
I love to see my children's faces light up when they have knowledge of how and why things work in this world. Learning an important part of life, and I really feel that there is more to learning than sitting in a classroom and reading out of a book. I believe when children can see with there own eyes, or do with there own hands there understanding and knowledge of the subject at hand is increased and they will have greater retention of that knowledge for future use.
Thursday, April 7, 2011
Winter Fun
By B.C.
I kick the ball with all my might! The crowd freezes in anticipation. It’s good! The fans go wild. We need exercise to keep our bodies healthy and strong. My favorite way to get exercise in the winter time is by playing sport games on the X-box. There are many different types of sports to play, but I like soccer the most.
Target Kick, Super Saver, and Super Strike are soccer games on the X-box that get my heart pumping. They are aerobic exercises. That means they exercise my heart. They also help me exercise my leg and arm muscles. I have to constantly use my leg muscle to kick the ball, and I have to block the ball with my arms.
In winter, it’s fun to play sports on the X-box for exercise. It helps keep my bodies healthy and strong.
Tuesday, March 29, 2011
My Horse Brownie
My Horse Brownie
by M C
My little pony's name is Brownie Vanilla Hot Chocolate. Her body is brown, and her tail and mane are white. Her eyes are brown. She has a pink and white zebra striped saddle, and a matching pink halter. I carry her around in her pink and white zebra striped shoulder bag. I love brownie very much.
Saturday, March 26, 2011
Easter Countdown
In our Discover the Joy of Easter book there was a cute activity on how to make an Easter countdown. It was very simple and provides a fun way for the kids to know "HOW MANY MORE DAYS UNTIL". You could adapt this idea for any countdown needs.


Subscribe to:
Comments (Atom)