Wednesday, October 19, 2011
Freezing Carrots
The kids and I planted and took care of a garden this year . Then we harvested the wonderful vegetables and fruits it produced. Now the question is what do we do with it all. Some of the produce we ate fresh out of the garden like the peas and spaghetti squash. Others we had to freeze or bottle(can) to preserve them for a later time, so they wouldn't go bad before we could eat them. We made pickled beets, and froze carrots. I did most of the beets by myself, but the kids helped with the carrots. We followed the instructions found in the link. It didn't take very long, and was simple enough for the kids to help.
Monday, October 3, 2011
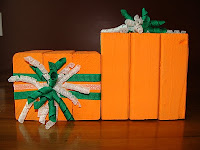
Pumpkin Table Center Piece
This Pumpkin project served two purposes. It makes a really cute Fall/Halloween craft, and it also was a recycling project. The materials we used for this craft were scrap materials from an uncle that is building a house. We rescued the wood form going to the dump. We also used scrap pieces of ribbon that were laying around the house.
If you would like to make one of these cute pumpkins here is how we made it.
 You will need:
1. 3 wood pieces of scrap 2x4's (size and shape depending on how big you want your pumpkin to be)
2. sand paper
3.Craft paint. We used Pure Pumpkin (dollar store)
4. Wood glue, or white glue would work
5.Hot glue and glue sticks*
6. Ribbon**
7. Small wood dowels,and clothes pins
8. Oven
*If you don't have hot glue you could probably use white glue, it would just take longer to dry and might not have as strong of hold.
**You could also use gift wrapping ribbon and curl it with scissors instead of curling ribbon in an oven. Then you will not need number 7 and 8.
Instructions:
1. With a small piece of sand paper smooth the edges and any rough spots of the wood pieces, and wipe off the dust particles.
2. Glue the 3 pieces of wood together with your wood glue to form the pumpkin block. We painted them first, but you can save time and paint if you glue them together first. Make sure your piece are lined up straight so the bottom is not wobbly. Let glue dry until pieces are suck firmly together. You may want to use a wood clamp if you have one. If some of the glue oozes out of the sides you can sand it off to male it smooth 3. After the pumpkin is glued together you can paint it. Allow the paint to dry between coats if more than one coat of paint is needed. Ours took 2 coats of paint
 4. There are a few different ways to finish off the pumpkin. One way is to wrap a thick ribbon(3")around the block and tie a bow on top. I would have done this if we had the ribbon.
The way we finished our pumpkins was by wrapping 3 ribbons around the block, glueing the ends with hot glue onto the top of the block so they didn't fall off. Then we curled some ribbon in the oven and hot glued a bunch of it on top of the block.


If you would like to make one of these cute pumpkins here is how we made it.
You will need:1. 3 wood pieces of scrap 2x4's (size and shape depending on how big you want your pumpkin to be)
2. sand paper
3.Craft paint. We used Pure Pumpkin (dollar store)
4. Wood glue, or white glue would work
5.Hot glue and glue sticks*
6. Ribbon**
7. Small wood dowels,and clothes pins
8. Oven
*If you don't have hot glue you could probably use white glue, it would just take longer to dry and might not have as strong of hold.
**You could also use gift wrapping ribbon and curl it with scissors instead of curling ribbon in an oven. Then you will not need number 7 and 8.
Instructions:
1. With a small piece of sand paper smooth the edges and any rough spots of the wood pieces, and wipe off the dust particles.
2. Glue the 3 pieces of wood together with your wood glue to form the pumpkin block. We painted them first, but you can save time and paint if you glue them together first. Make sure your piece are lined up straight so the bottom is not wobbly. Let glue dry until pieces are suck firmly together. You may want to use a wood clamp if you have one. If some of the glue oozes out of the sides you can sand it off to male it smooth
3. After the pumpkin is glued together you can paint it. Allow the paint to dry between coats if more than one coat of paint is needed. Ours took 2 coats of paint4. There are a few different ways to finish off the pumpkin. One way is to wrap a thick ribbon(3")around the block and tie a bow on top. I would have done this if we had the ribbon.The way we finished our pumpkins was by wrapping 3 ribbons around the block, glueing the ends with hot glue onto the top of the block so they didn't fall off.
Then we curled some ribbon in the oven and hot glued a bunch of it on top of the block.Saturday, October 1, 2011
13 Artilces of Faith
As members of The Church of Jesus Christ of Latter-Day Saints we try and incorporate the gospel of Jesus Christ into our studies. One of our goal for this school year is to memorize and understand the 13 Articles of Faith. An other way we incorporate the teaching of the church is by studying the Book of Mormon. Discover the Scriptures is a great program of study that allows us to use scripture verse to teach memorization skills, reading comprehension and cursive lettering practice. It also offers great memory verse opportunities.
Ice Ice Baby
Can states of matter really change? To answer this question, Miss. M wanted to see if she could change a liquid (water) into a solid (ice), and a liquid (water) into a gas (water vapor). For the first part of her experiment she filled an ice cube tray with water and placed it into the freezer for 4-5 hours. The freezer lowered the temperature of the water below zero degrees Celsius, and walla, the water (liquid) froze into ice (solid). The next step of her experiment was to see if she could change the ice(solid) back in to water (liquid). To do this she took the tray of ice cubes out of the freezer, and placed them onto the counter top. As she observed the ice cubes she noticed that it didn't take long before the ice started to melt back into water. For Miss. M's final test she sprayed a plate with water (liquid) form a water bottle and placed the plate outside in the hot sun. After waiting a few hours she checked back one the plate, and much to her surprise the water was gone. It had turned into water vapor (gas).
Miss. M then concluded that you can indeed change the state of matter.
Miss. M then concluded that you can indeed change the state of matter.
Subscribe to:
Comments (Atom)